Friday, June 22, 2012

DIY handfasting cords

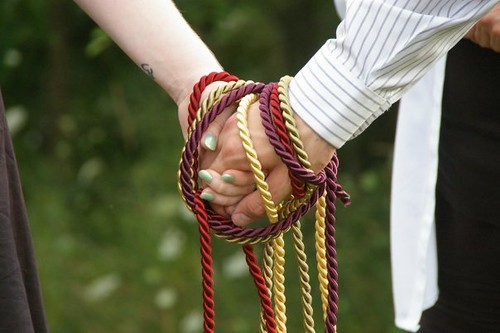
I ended up buying some thicker cord and instead of braiding them together (which would have looked awesome) went with a 6 cord look.

Now I wanted to add beads and knots, I knew that so I went on an internet hunt and found this awesome one: Monkeys Fist

I looked up a few youtube videos and practices a few times and then went to work knotting one of each of my 6 ropes. I then went to bead store and got some bobbles for the ropes. 
I went with one dangly one and one simple one per rope. 

TA DA 
That is 6 ropes and some wonderful Kona Coffee! 

Now in order to keep my ropes nice and happy, and for after the handfasting I bought a nice box to keep them in. So here they are in their forever home! 

I'm happy with the box too, I think its super cute!


Thats all for now!


Tuesday, June 19, 2012

Oh god....


That is what my mom said when I told her I was making my dress. But never fear! I am almost done! Like I said in the previous post I already for married last year, and this event is more of a reception just a year later.

I got married in a dress I made last year, and so the idea of making another dress is not totally out of left field. It’s just that, I'm super busy... so... this was an crazy idea. I basically took 2 weekends off the calendar and worked. I have 2 more weekends, and I am almost done.


I also purposely went for an easier pattern, and I am happy the way it is turning out. I still need to sew a sash, attach the lining for the skirt, the zipper and hem.

SO CLOSE!

I'm not sure I recommend sewing a dress the month before the event, but it has been calming to just sit down and sew.

Wednesday, May 30, 2012

handfasting: making the cord

I am already legally married.
So I can do whatever the hell I want! It is a wonderful feeling.

So, we are going to get tied together! Handfasting!

Handfasting is something that I see echos of all over the place. Some eastern traditional weddings there are either ropes or cloths or something tied or draped over the couples hands. There is also the phrase "tying the knot". This seems like a ritual that is so full of imagery and meaning and history.

Now comes the hard part. Making the rope and writing the ceremony. I found one online that had a motif of hands. I liked that one a lot.

I am working on the making the rope part first and thinking about the wording and ceremony as I go. My husband wants to use a knot that he can write meaning into. I am excited that he is getting into this as well.

So. Onto making the rope.
I really like this design!
I bought three cords today at the fabric store. I am going for jewel colors. deep and rich. Purple blue and green. Now I need to braid it. I like that this braid looks thick and round. So I spent some time googling around and found this video. 


I need to practice... first pass didn't go so well 

So I am working on it! I'll let you know how its going!

DIY wedding

I have no idea what I am doing.
No really.

I never liked weddings that much as a kid (and didn't really think I would have one, I saw myself more as the cat lady) and then I met this wonderful guy (awwwww). We eloped, and are now having a 1 year anniversary/wedding/party thing.

I really seriously have no idea what I am doing. I think I keep doing things backwards. I got the venue booked and then made the guest list. Invites are out and now I have to do the rest.

What follows is a series of posts about my lack of knowledge about how to plan a wedding. I tend to flip out every few days or so... should be entertaining....

~Pohaku

Saturday, April 28, 2012

Look! I can make things!

I tried to make coconut oil again last night and ended up with something closer to coconut jello. FAIL!

But I did manage to make an enclosure for a little guy I found in the middle of the road!

Spike is an invasive Jackson's Chameleon and is now our personal little dinosaur!

We had a small terrarium that we were keeping geckos in on and off ( we have a history of catching scaly friends) and that was just too small.

So off to the hardware store we went! I would like to point out that the tools we have are the following
- hand saw
- hammer
- converting screw driver
- staple gun
- leather man
- wire cutters and wire shears

We used to have more but we didn't bring much when we moved. So with some lumber screen from a repair if some kitty damage and our minimal tools we made this!


We are not done yet but it is functional and Spike loves his new home! He went exploring ( screen is way better than glass! He can hold on to screen!) and us currently sitting on his big stick with his tail curled up!

I am feeling accomplished and wanted to share a success!

Saturday, April 21, 2012

Coconut oil. Trial and mostly error

I will admit it, I failed miserably at my first two attempts at making coconut oil.
Here is a step by step of what I did and where I went wrong...

Attempt #1
- The first and easiest step for me in making the coconut bowls is having my other half, halve them and take out the coconut meat. I took the left overs from the latest bowl and used them for this first attempt.
- I them broke the meat into small pieces and placed them in the blender with some water. I added the water slowly until it all mixed well.
- Them I poured the coconut awesomeness into a large bowl.
- then I kneaded it for a while. (this got messy)
- I DID NOT THINK AHEAD and had to call for my husband again, and get him to bring me another bowl and a strainer.
- Messy hands and all I squeezed the coconut meat through the strainer into the other bowl. It felt awesome between my fingers!

I think to here I did ok!

Here is where I went wrong....
I put the mess on the stove. Once it was boiling it went CRAZY! I think there was more water in it then I was aware. According to the video I posted last time what I SHOULD have done was let it sit for a while and settle. Then the water would have partially separated from the coconut milk and it would not have boiled so violently. Well I didn't. It overflowed. All over the stove. At this point I decided to stop.

OOPS!
The left over coconut meat

Attempt #2
My thinking was "maybe the whole extracting the coconut milk AND making the oil was too much for the first time, I'll start with my canned coconut milk!"

- Emptied can into pot
- turned on heat
- waiting for a while
- watched it boil
- freaked out that it was taking too long and stopped.

I think I was on the right track and just quit before I was done! I kept the now concentrated coconut oil so I might give it another shot.
I think I am on the right track! 


Monday, April 16, 2012

Directions? Who needs that!?

Coconut oil is awesome! It is amazing for cooking, amazing for my coconuts, and awesome as a beauty project!

I can skim through some sites and videos and figure it out right?

NO!

First attempt ended in a HUGE mess, second? well not so hot either.

Next I am going to follow this video.